Extruding Faces

 |
There are three tools in Lightwave 3D that you will need for this technique:
bevel, smooth shift and subpatch. The first two will create the structure
of your model, and subpatch will turn your low-polygon structure into a
smoother, organic shape.
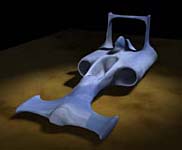
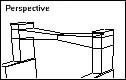
The ship's beginnings are humble-it starts life as a box. A bit of clever polygon manipulation turns this simple primitive into the fundamental structure of the ship. Warning: while doing this exercise, never delete a face if you don't like it - only undo. If undo won't give you what you want, you may need to start over. |
 |
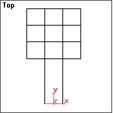
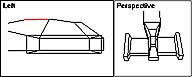
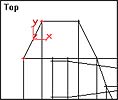
The model can be divided into three sections along its front. See the center nose, and two intakes on either side of the model? In the top viewport, create a box with 3 length segments and 3 width segments. (150 units X 150 units X 50 units) Front to back, we could use just one segment, but lets use three to be symmetrical. |
 |
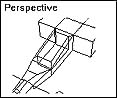
Using the perspective viewport, select the middle front face of the box. Select the Bevel button in the Modify Tab. Now, you can either click and drag the face in the viewport, or click and drag the amount spinner (100). |
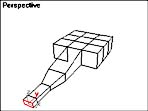 |
Switch to the stretch tool and scale the face along the Y axis to make it a bit shorter (50%), then use the move tool to move it back down, even with the bottom of the mesh. Bevel again (50) and Scale again (50%), and move the face down even with the bottom of the mesh. Bevel again (50) the sides of this extrusion is where the front fins will come from. Bevel again (15). This is for the bump beyond the fin. |
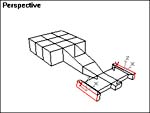 |
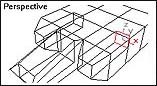
Now for the front fin. Select both side faces in that second from the end box. Select one face then rotate to spin the car around and then SHIFT-select the other. With both faces selected, you can Bevel in opposite directions. Bevel the fins(50). to make the bump at the end, we are going to bevel very slightly(5) and then scale up(150%). Bevel again(10). Save your mesh. |
 |
Adding detail: select the top faces of the first three sections and smooth shift(15). Uniform scale (50%). Look at a right or left view. See the face that angles up? select it and rotate it to be parallel with the ground. This will give a bit of a bump to the nose. |
 |
Adding a cockpit: The large polygon above what we just did will be a sunken cockpit. Select that face and bevel slightly (5). Uniform Scale slightly (75%). And bevel backwards into the mesh (-25). Now, I think you will have to use the spinners for this one. You cannot bevel negative by clicking and dragging in the viewport. You may want to rotate and move that face depending on what kind of floor you want in your cockpit. |
 |
Adding those holes on the sides: select one of the faces on the main mesh beside the nose. Bevel (25), uniform scale (50%), bevel negative (100) Repeat for other side. |
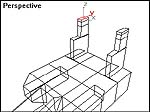 |
Tail Fin Supports: select one of the outside top faces toward the back of the main mesh . Bevel very slight (1), stretch to make it thin (20%) bevel (50). Again, bevel very slight (1), non-uniform scale (50%) to cut the polygon in half front to back. Move this polygon toward the back of the mesh. Bevel (25), bevel (10)-the fin will come from this section, bevel (5)-this is the bump on the top of the support. Repeat for other side. Save your mesh. |
 |
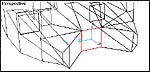
To make the fin, we are going to bevel the two inner faces toward each other and then weld the verticies together. Select both faces (second from the top) and bevel until they meet (about 45). Use the top viewport to zoom into the two faces you just beveld, move the faces to better line up the verticies, and region select the verticies that make up those faces. You can test the result by moving a vertex and seeing if everything is connected. Uniform scale the verticies (50%). |
 |
Adding a bit more detail to the body: Bevel the three middle sections of the body (20) and uniform scale (75%). Deselect the front polygon and using the back two; bevel (15) and scale (50). |
 |
Adding those holes on the sides part 2:The back end. Turn the model around so you can see the back. Make holes, as before, in the outside sections. Choose the outside faces. Bevel (25), uniform scale (50%), bevel negative (100). If you would like to have the holes go all the way through, weld the verticies and delete the inner faces as you did on the back fin. |
 |
Sculpting the back end: To streamline the ship/car, taper the back end. In the top viewport, select the outer-most verticies and move them toward center. Then switch to a left or back viewport and non-uniform scale the verticies (50%) so that they are shorter. Repeat for other side. |
 |
Select the middle face on the back and uniform scale 50%. Save your mesh. |
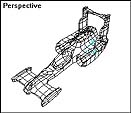 |
Now for the incredibly cool part! Convert the faces using the subpatch modifier. Save your mesh! |
Experiment - go wild - try anything - there are lots of undo's.